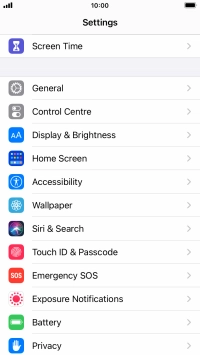
1. Find "Screen Time"
Press Settings.
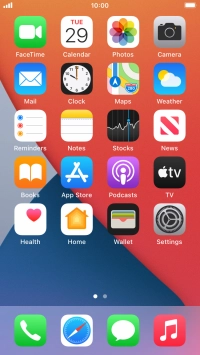
![](http://wmstatic.global.ssl.fastly.net/ml/7140723-f-1d2f420d-d3ad-4187-a1d0-cd35df771d84.png?width=200&height=358)
Press Screen Time.
![](http://wmstatic.global.ssl.fastly.net/ml/7140723-f-47aee9ee-a824-4936-a522-80c0f8a5d335.png?width=200&height=358)
2. Turn on Screen Time
Press Turn On Screen Time.
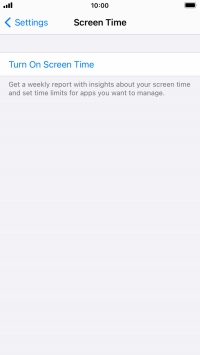
![](http://wmstatic.global.ssl.fastly.net/ml/7140723-f-88d70db3-449c-4ef3-902c-0bd9a769c14a.png?width=200&height=358)
Press Continue.
![](http://wmstatic.global.ssl.fastly.net/ml/7140723-f-1113ea91-66b4-40fa-bd80-f28a031b7498.png?width=200&height=358)
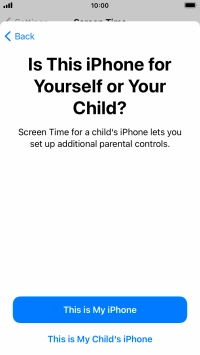
Press This is My iPhone.
![](http://wmstatic.global.ssl.fastly.net/ml/7140723-f-b6e3f50e-5b2e-4c84-a505-0797a3ff701b.png?width=200&height=358)
3. Select Downtime settings
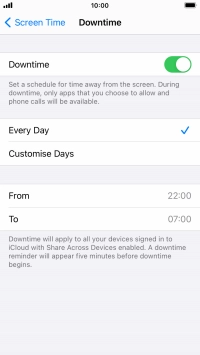
Press Downtime.
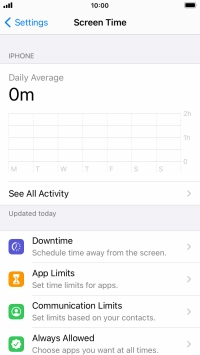
![](http://wmstatic.global.ssl.fastly.net/ml/7140723-f-a12c4f12-d4f9-4c09-ae01-83f621e49871.png?width=200&height=358)
Press the indicator next to "Downtime" and follow the instructions on the screen to select Downtime period.
During Downtime only calls and allowed apps will be available.
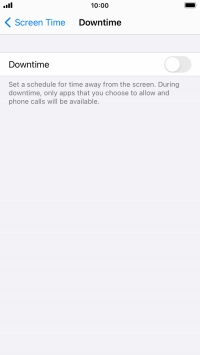
![](http://wmstatic.global.ssl.fastly.net/ml/7140723-f-edd3abf4-5eeb-4049-a8f3-83b270b9b78a.png?width=200&height=358)
Press arrow left.
![](http://wmstatic.global.ssl.fastly.net/ml/7140723-f-deb0101e-2870-41fb-a62e-d6421ac581f3.png?width=200&height=358)
4. Select time limits for app usage
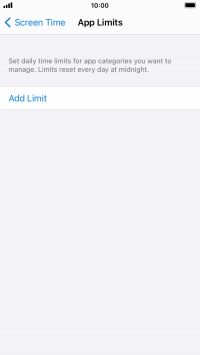
Press App Limits.
![](http://wmstatic.global.ssl.fastly.net/ml/7140723-f-a12c4f12-d4f9-4c09-ae01-83f621e49871.png?width=200&height=358)
Press Add Limit.
![](http://wmstatic.global.ssl.fastly.net/ml/7140723-f-ebc617a0-1702-4c49-815d-2d881c6dfbb9.png?width=200&height=358)
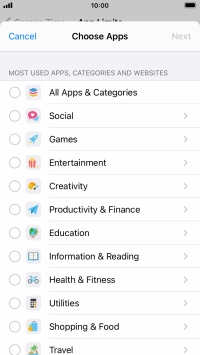
Press the required categories.
![](http://wmstatic.global.ssl.fastly.net/ml/7140723-f-be72e7cc-bcbf-4c3c-ac14-f2a09e2f964d.png?width=200&height=358)
Press Next.
![](http://wmstatic.global.ssl.fastly.net/ml/7140723-f-7a24e261-5994-49ad-932c-73f3b95aae58.png?width=200&height=358)
Set the required time limit for use of the selected category.
![](http://wmstatic.global.ssl.fastly.net/ml/7140723-f-9da0a616-a415-4bd6-b89b-99470cc188fb.png?width=200&height=358)
5. Select days for time limits of app usage
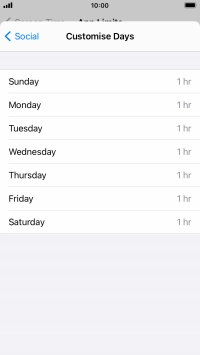
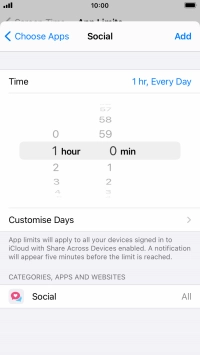
Press Customise Days.
![](http://wmstatic.global.ssl.fastly.net/ml/7140723-f-f1e32f51-b5ab-4348-aaaf-1e0397ced82b.png?width=200&height=358)
Press the required days.
![](http://wmstatic.global.ssl.fastly.net/ml/7140723-f-8b19adbb-9f25-4e43-875c-65c81db78d9f.png?width=200&height=358)
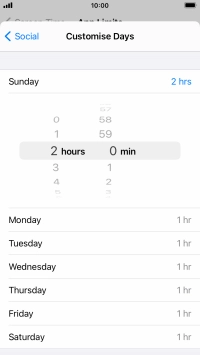
Select the required time limit.
![](http://wmstatic.global.ssl.fastly.net/ml/7140723-f-4cc9b326-e426-476c-a26b-a9d7cf6f970c.png?width=200&height=358)
Press arrow left.
![](http://wmstatic.global.ssl.fastly.net/ml/7140723-f-4cc9b326-e426-476c-a26b-a9d7cf6f970c.png?width=200&height=358)
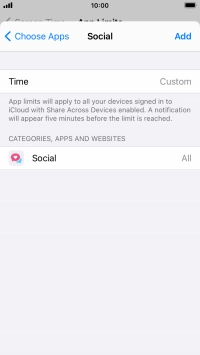
Press Add.
![](http://wmstatic.global.ssl.fastly.net/ml/7140723-f-6984a742-fd45-4d72-bcc1-e542079d2412.png?width=200&height=358)
6. Delete time limits for app usage
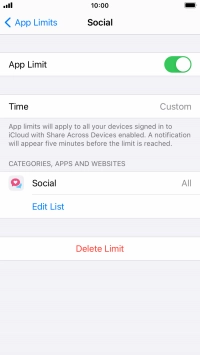
Press the required category.
![](http://wmstatic.global.ssl.fastly.net/ml/7140723-f-24ed19b0-a82b-4c16-a9ba-082819568ca8.png?width=200&height=358)
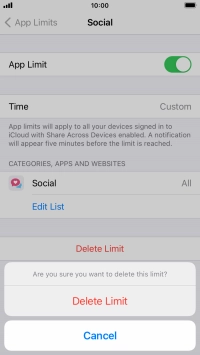
Press Delete Limit.
![](http://wmstatic.global.ssl.fastly.net/ml/7140723-f-a8911f4c-94eb-4220-97d3-c5e411135efd.png?width=200&height=358)
Press Delete Limit.
![](http://wmstatic.global.ssl.fastly.net/ml/7140723-f-27461dd9-ff53-4897-82e9-492b2eda6a1b.png?width=200&height=358)
Press arrow left.
![](http://wmstatic.global.ssl.fastly.net/ml/7140723-f-ebc617a0-1702-4c49-815d-2d881c6dfbb9.png?width=200&height=358)
7. Select communication limits during Screen Time
Press Communication Limits.
![](http://wmstatic.global.ssl.fastly.net/ml/7140723-f-a12c4f12-d4f9-4c09-ae01-83f621e49871.png?width=200&height=358)
Press During Screen Time.
![](http://wmstatic.global.ssl.fastly.net/ml/7140723-f-d0c6ca21-2ef6-4458-9117-ff4602e08e2e.png?width=200&height=358)
Press the required setting.
During Screen Time, only communication with allowed contacts is available.
![](http://wmstatic.global.ssl.fastly.net/ml/7140723-f-d407f149-86ef-4479-9562-db4fccf2a6a1.png?width=200&height=358)
Press arrow left.
![](http://wmstatic.global.ssl.fastly.net/ml/7140723-f-d407f149-86ef-4479-9562-db4fccf2a6a1.png?width=200&height=358)
8. Select communication limits during Downtime
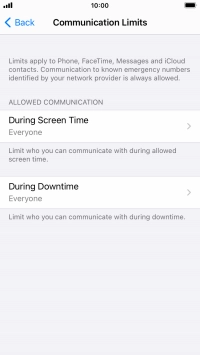
Press During Downtime.
![](http://wmstatic.global.ssl.fastly.net/ml/7140723-f-d0c6ca21-2ef6-4458-9117-ff4602e08e2e.png?width=200&height=358)
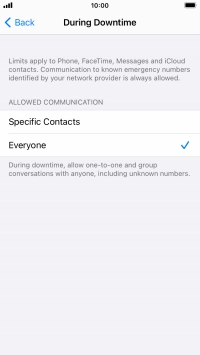
Press the required setting.
During Downtime, only communication with allowed contacts is available.
![](http://wmstatic.global.ssl.fastly.net/ml/7140723-f-9d0aef0c-d389-430a-aa2e-f72e32f20611.png?width=200&height=358)
If you select Specific Contacts, follow the instructions on the screen to select the required contacts.
![](http://wmstatic.global.ssl.fastly.net/ml/7140723-f-9d0aef0c-d389-430a-aa2e-f72e32f20611.png?width=200&height=358)
Press arrow left.
![](http://wmstatic.global.ssl.fastly.net/ml/7140723-f-9d0aef0c-d389-430a-aa2e-f72e32f20611.png?width=200&height=358)
Press arrow left.
![](http://wmstatic.global.ssl.fastly.net/ml/7140723-f-d0c6ca21-2ef6-4458-9117-ff4602e08e2e.png?width=200&height=358)
9. Select apps that can be used during Downtime
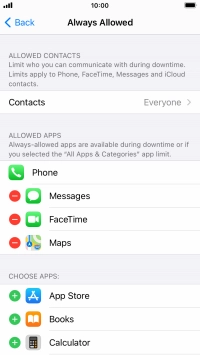
Press Always Allowed.
![](http://wmstatic.global.ssl.fastly.net/ml/7140723-f-a12c4f12-d4f9-4c09-ae01-83f621e49871.png?width=200&height=358)
Press the add icon next to the required app to add it to the list of allowed apps during Downtime.
![](http://wmstatic.global.ssl.fastly.net/ml/7140723-f-bcb69a46-5494-437a-a44d-f3aa4a875fa7.png?width=200&height=358)
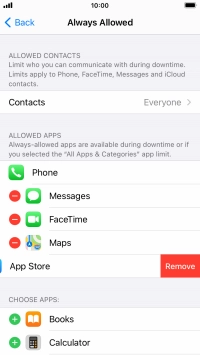
Press the remove icon next to the required app to remove it from the list of allowed apps during Downtime.
![](http://wmstatic.global.ssl.fastly.net/ml/7140723-f-53cdbb5c-ef10-4961-8551-33406a95e93d.png?width=200&height=358)
Press Remove.
![](http://wmstatic.global.ssl.fastly.net/ml/7140723-f-588f9e5b-9d03-4c07-b60a-cb18732cd9f4.png?width=200&height=358)
Press arrow left.
![](http://wmstatic.global.ssl.fastly.net/ml/7140723-f-bcb69a46-5494-437a-a44d-f3aa4a875fa7.png?width=200&height=358)
10. Select settings for content and restrictions
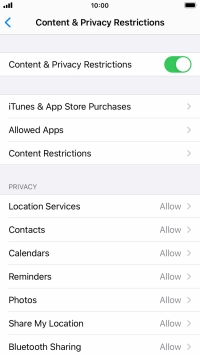
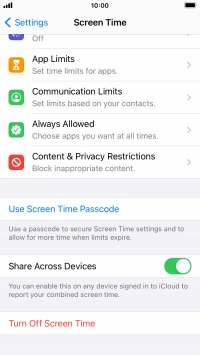
Press Content & Privacy Restrictions.
![](http://wmstatic.global.ssl.fastly.net/ml/7140723-f-1f9ac2dd-b8ae-4cc2-9af1-274577ac3030.png?width=200&height=358)
Press the indicator next to "Content & Privacy Restrictions" and follow the instructions on the screen to select settings for content and privacy restrictions.
![](http://wmstatic.global.ssl.fastly.net/ml/7140723-f-7a7bdec6-9860-4453-bcce-e116ea0c2d89.png?width=200&height=358)
Press arrow left.
![](http://wmstatic.global.ssl.fastly.net/ml/7140723-f-f1eaf677-c209-48cf-84f5-1de15e8a23c3.png?width=200&height=358)
11. Turn on use of password
Press Use Screen Time Passcode and follow the instructions on the screen to select a Screen Time password.
If you turn on the function, you need to key in the password to access Screen Time settings.
![](http://wmstatic.global.ssl.fastly.net/ml/7140723-f-1f9ac2dd-b8ae-4cc2-9af1-274577ac3030.png?width=200&height=358)
12. Return to the home screen
Press the Home key to return to the home screen.
![](http://wmstatic.global.ssl.fastly.net/ml/7140723-f-a12c4f12-d4f9-4c09-ae01-83f621e49871.png?width=200&height=358)